Building a high available MySQL database cluster, from two master MySQL nodes, with load balancing and failover capability based on HAProxy & Heartbeat.
On most of modern projects, the database availability is a matter of life and death. Good solution will be creation a distributed database cluster, from more then one MySQL server, that can take care of load balancing, failover capabilities and data replication. Also, you can split an incoming requests and take care about high load.
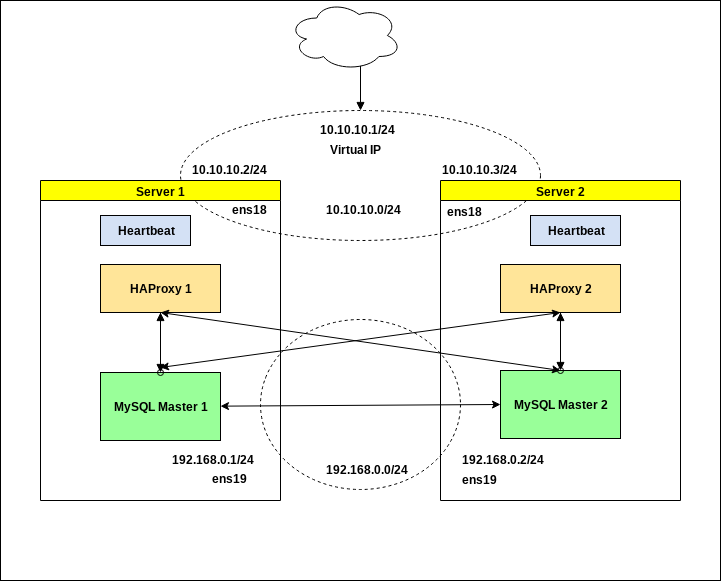
In this example I will show creating a MySQL cluster from two master nodes, main idea is to create a pair of servers with same configurations and one virtual IP for taking requests. This cluster will continue working even after totally losing one of the nodes.
We’ll use a two servers (virtual or bare metal) with pair of MySQL masters and a pair of HAProxy installed on them, the main virtual IP will be configured with Heartbeat. Please mind that in this example only one HAProxy be using in one time period, the second HAProxy will be standing in hot reserve. MySQL servers will be recycle with round robin type of load balancing.

The schema with two servers was chosen for making an example simpler. Of course if you have an additional servers, you can create a more complicated configurations, putting HAProxy with Heartbeat in external LB cluster and so on. But anyway, this example will be a quite enough for building a strong looking DB cluster inside your project.
0. Preparing.
First we’ll need to choose few subnets for the MySQL replications and for the HAProxy with Heartbeat, better separate them and if your server have a few network interface put these subnets on different interfaces as well.
192.168.0.0/24 - network for DB traffic
192.168.0.1 IP for MySQL1, 192.168.0.2 IP for MySQL2.
10.10.10.0/24 - network for the Heartbeat & HAProxy.
10.10.10.1 Virtual IP for taking requests, 10.10.10.2 main IP for sever1, 10.10.10.3 main IP for server2.
The /29 subnets will be quite enough in fact :)
1. Configuring MySQL servers with master - master replication.
First we need to install MySQL on both of ours servers:
# apt-get update && apt-get upgrade -y# apt-get install mysql-server mysql-client
Then edit the /etc/mysql/my.cnf on first and second node, to enable replication between MySQL servers and make them use IPS from 192.168.0.0/24 subnet:
Server1 configuration.
[mysqld]bind-address    = 192.168.0.1server_id           = 1
log_bin             = /var/log/mysql/mysql-bin.log
log_bin_index       = /var/log/mysql/mysql-bin.log.index
relay_log           = /var/log/mysql/mysql-relay-bin
relay_log_index     = /var/log/mysql/mysql-relay-bin.index
expire_logs_days    = 10
max_binlog_size     = 100M
log_slave_updates   = 1
auto-increment-increment = 2
auto-increment-offset = 1
Server2 configuration.
[mysqld]bind-address    = 192.168.0.2server_id           = 2
log_bin             = /var/log/mysql/mysql-bin.log
log_bin_index       = /var/log/mysql/mysql-bin.log.index
relay_log           = /var/log/mysql/mysql-relay-bin
relay_log_index     = /var/log/mysql/mysql-relay-bin.index
expire_logs_days    = 10
max_binlog_size     = 100M
log_slave_updates   = 1
auto-increment-increment = 2
auto-increment-offset = 2
Then restart them both and make sure MySQL leaf on specified IP:
server1# systemctl restart mysqlserver1# netstat -ntlpActive Internet connections (only servers)
Proto Recv-Q Send-Q Local Address           Foreign Address         State       PID/Program name
tcp        0      0 192.168.0.1:3306        0.0.0.0:*               LISTEN      9057/mysqldserver2# systemctl restart mysqlserver2# netstat -ntlpActive Internet connections (only servers)
Proto Recv-Q Send-Q Local Address           Foreign Address         State       PID/Program name
tcp        0      0 192.168.0.2:3306        0.0.0.0:*               LISTEN      8740/mysqld
Now will create a user for replication between databases, you can use pwgen utility to generate strong enough password. Connect to each MySQL servers and create this user with IP from opposite server:
server1# mysql -u root -pMariaDB> GRANT REPLICATION SLAVE ON *.* TO 'replicauser'@'192.168.0.2' IDENTIFIED BY 'somestrongpassword';server2# mysql -u root -pMariaDB> GRANT REPLICATION SLAVE ON *.* TO 'replicauser'@'192.168.0.1' IDENTIFIED BY 'somestrongpassword';
Check that replicauser have access for each MySQL server.
server1# mysql -u replicauser -p -h 192.168.0.2
Enter password: somestrongpassword
Welcome to the MariaDB monitor.  Commands end with ; or \g.
bla bla....server2# mysql -u replicauser -p -h 192.168.0.1
Enter password: somestrongpassword
Welcome to the MariaDB monitor.  Commands end with ; or \g.
bla bla....
Fine, now we can continue with configuring replication between MySQL servers. From that time better to have opened two consoles from both of MySQL servers, as we need to input commands, based on output from another server.
Get the MySQL master status on server1:
server1# mysql -u root -pMariaDB> SHOW MASTER STATUS;+------------------+----------+--------------+------------------+
| File             | Position | Binlog_Do_DB | Binlog_Ignore_DB |
+------------------+----------+--------------+------------------+
| mysql-bin.000002 |      531 |              |                  |
+------------------+----------+--------------+------------------+
1 row in set (0.00 sec)
We’ll need the File and Position information, from this output. Open the MySQL console on server2 and configure the slave relation with first server.
server2# mysql -u root -pMariaDB> STOP SLAVE;MariaDB> CHANGE MASTER TO master_host='192.168.0.1', master_port=3306, master_user='replicauser', master_password='somestrongpassword', master_log_file='mysql-bin.000002', master_log_pos=531;MariaDB> START SLAVE;
Now query the master status from server2 and configure slave relation for MySQL on first server.
server2# mysql -u root -pMariaDB> SHOW MASTER STATUS;+------------------+----------+--------------+------------------+
| File             | Position | Binlog_Do_DB | Binlog_Ignore_DB |
+------------------+----------+--------------+------------------+
| mysql-bin.000002 |      531 |              |                  |
+------------------+----------+--------------+------------------+
1 row in set (0.00 sec)server1# mysql -u root -pMariaDB> STOP SLAVE;MariaDB> CHANGE MASTER TO master_host='192.168.0.2', master_port=3306, master_user='replicauser', master_password='somestrongpassword', master_log_file='mysql-bin.000002', master_log_pos=531;MariaDB> START SLAVE;
OK, if all was done right, we must have a working replication between MySQL masters. You can create some test DB and check this.
server1# mysql -u root -pMariaDB> CREATE DATABASE TESTDB;
MariaDB> CREATE TABLE TESTDB.REPLICA (`id` varchar(40));
Then check this database was appeared on second server as well:
server2# mysql -u root -pMariaDB> SHOW TABLES IN TESTDB;
+------------------+
| Tables_in_TESTDB |
+------------------+
| REPLICA          |
+------------------+
1 row in set (0.00 sec)
And as you can see, the TESTDB base was successfully replicated to server2. We just completed a first stage of creating our failover cluster.
2. Configuring HAProxy on both servers.
In second stage we’ll install and configure two absolutely identical HAProxy on both of our servers, for balancing a incoming requests between MySQL servers.
First we need to add additional user on our MySQL servers (user must be created without any password), this user will be used by HAProxy for checking a health status of MySQL servers.
server1# mysql -u root -pMariaDB> CREATE USER 'haproxy_check'@'%';
MariaDB> FLUSH PRIVILEGES;
You can create this user on any of our MySQL servers, as we have a replication configured between them. Check that user was added, using this command:
server1# mysql -u root -p -e "SELECT User, Host FROM mysql.user"
Enter password:
+---------------+-------------+
| User          | Host        |
+---------------+-------------+
| haproxy_check | %           |
| replicauser   | 192.168.0.2 |
| root          | localhost   |
+---------------+-------------+server2# mysql -u root -p -e "SELECT User, Host FROM mysql.user"
Enter password:
+---------------+-------------+
| User          | Host        |
+---------------+-------------+
| haproxy_check | %           |
| replicauser   | 192.168.0.1 |
| root          | localhost   |
+---------------+-------------+
Also let’s create a user with root privileges, for making some test requests later:
server1# mysql -u root -pMariaDB> CREATE USER 'haproxy_root'@'%' IDENTIFIED BY 'password';
MariaDB> GRANT ALL PRIVILEGES ON *.* TO 'haproxy_root'@'%';
Now it’s time for HAProxy installation:
server1# apt-get install haproxy
server2# apt-get install haproxy
Save original config and create new one:
server1# mv /etc/haproxy/haproxy.cfg{,.back}
server1# vi /etc/haproxy/haproxy.cfg
Next add this configuration on both servers:
global
    user haproxy
    group haproxydefaults
    mode http
    log global
    retries 2
    timeout connect 3000ms
    timeout server 5000ms
    timeout client 5000mslisten stats
    bind 10.10.10.1:9999
    stats enable
    stats hide-version
    stats uri /stats
    stats auth statadmin:statadminpasslisten mysql-cluster
    bind 10.10.10.1:3306
    mode tcp
    option mysql-check user haproxy_check
    balance roundrobin
    server mysql-1 192.168.0.1:3306 check
    server mysql-2 192.168.0.2:3306 check
As you can see, both HAProxy services will use 10.10.10.1, shared IP address. This virtual IP will move on between servers, so we need to make some trick and enable net.ipv4.ip_nonlocal_bind sysctl option, to allow system services binding on the non-local IP.
Add to the file /etc/sysctl.conf this option:
server1# vi /etc/sysctl.confnet.ipv4.ip_nonlocal_bind=1server2# vi /etc/sysctl.confnet.ipv4.ip_nonlocal_bind=1
Then run
sysctl -p
After this, we can start HAProxy on both servers:
server1# systemctl start haproxy
server2# systemctl start haproxy
Check they started on shared IP 10.10.10.1:
server1# netstat -ntlp Active Internet connections (only servers)
Proto Recv-Q Send-Q Local Address Foreign Address State PID/Program name
tcp 0 0 192.168.0.1:3306 0.0.0.0:* LISTEN 918/mysqld
tcp 0 0 10.10.10.1:3306 0.0.0.0:* LISTEN 802/haproxy
tcp 0 0 10.10.10.1:9999 0.0.0.0:* LISTEN 802/haproxy
tcp 0 0 10.10.10.2:22 0.0.0.0:* LISTEN 785/sshdserver2# netstat -ntlpActive Internet connections (only servers)
Proto Recv-Q Send-Q Local Address Foreign Address State PID/Program name
tcp 0 0 192.168.0.2:3306 0.0.0.0:* LISTEN 918/mysqld
tcp 0 0 10.10.10.1:3306 0.0.0.0:* LISTEN 802/haproxy
tcp 0 0 10.10.10.1:9999 0.0.0.0:* LISTEN 802/haproxy
tcp 0 0 10.10.10.3:22 0.0.0.0:* LISTEN 785/sshd
Everything look’s OK, both servers was started using virtual IP, also we configured a stats page on 9999 port, so you can check the HAProxy status on http://10.10.10.1:9999/stats using statadmin:statadminpass.
3. Configuring Heartbeat with shared IP.
On last stage we need to configure the Heartbeat service on both of the servers, and create shared IP, that will be used for serving incoming requests. This IP will migrate between servers if something wrong happens to one of them.
Install Heartbeat on both servers:
server1# apt-get install heartbeat
server1# systemctl enable heartbeatserver2# apt-get install heartbeat
server2# systemctl enable heartbeat
Now we need to create a few configuration files for it, they will be mostly the same for the server1 and server2.
Create a /etc/ha.d/authkeys, in this file Heartbeat stored data to authenticate each other. File will be the same on both servers:
server1# vi /etc/ha.d/authkeysauth 1
1 md5 securepassserver2# vi /etc/ha.d/authkeysauth 1
1 md5 securepass
Change the securepass to your strong secure password. Also, this file need to be owned by root only, so:
server1# chmod 600 /etc/ha.d/authkeys
server2# chmod 600 /etc/ha.d/authkeys
Next will create a main configuration for Heartbeat on both servers, it’ll be a bit different for server1 and server2, create /etc/ha.d/ha.cf:
server1
server1# vi /etc/ha.d/ha.cf#       keepalive: how many seconds between heartbeats
#
keepalive 2
#
#       deadtime: seconds-to-declare-host-dead
#
deadtime 10
#
#       What UDP port to use for udp or ppp-udp communication?
#
udpport        694
bcast  ens18
mcast ens18 225.0.0.1 694 1 0
ucast ens18 10.10.10.3
#       What interfaces to heartbeat over?
udp     ens18
#
#       Facility to use for syslog()/logger (alternative to log/debugfile)
#
logfacility     local0
#
#       Tell what machines are in the cluster
#       node    nodename ...    -- must match uname -n
node    server1
node    server2
server2
server1# vi /etc/ha.d/ha.cf#       keepalive: how many seconds between heartbeats
#
keepalive 2
#
#       deadtime: seconds-to-declare-host-dead
#
deadtime 10
#
#       What UDP port to use for udp or ppp-udp communication?
#
udpport        694
bcast  ens18
mcast ens18 225.0.0.1 694 1 0
ucast ens18 10.10.10.2
#       What interfaces to heartbeat over?
udp     ens18
#
#       Facility to use for syslog()/logger (alternative to log/debugfile)
#
logfacility     local0
#
#       Tell what machines are in the cluster
#       node    nodename ...    -- must match uname -n
node    server1
node    server2
The node names for this config you can get by running
uname -n on your servers.
And last we need to create the /etc/ha.d/haresources file on server1 and server2. File be the same and in this file we’ll declare our shared IP address and master node by default:
server1# vi /etc/ha.d/haresourcesserver1 10.10.10.1server2# vi /etc/ha.d/haresourcesserver1 10.10.10.1
After all let’s start our Heartbeat services on both servers, and you must see that on server1 we have the virtual IP up:
server1# ip a
....
2: ens19: <BROADCAST,MULTICAST,UP,LOWER_UP> mtu 1500 qdisc pfifo_fast state UP group default qlen 1000
    link/ether bla:bla:bla:bla brd ff:ff:ff:ff:ff:ff
    inet 192.168.0.1/24 brd 192.168.0.255 scope global ens19
       valid_lft forever preferred_lft forever
    inet6 fe80::bla:bla:bla:bla/64 scope link
       valid_lft forever preferred_lft forever
3: ens18: <BROADCAST,MULTICAST,UP,LOWER_UP> mtu 1500 qdisc pfifo_fast state UP group default qlen 1000
    link/ether bla:bla:bla:bla:bla:bla brd ff:ff:ff:ff:ff:ff
    inet 10.10.10.2/24 brd 10.10.10.255 scope global ens18
       valid_lft forever preferred_lft forever
    inet 10.10.10.1/24 brd 10.10.10.255 scope global secondary
....
OK, now we have virtual IP assigned on our server1 and HAProxy listening on it, so we can check how it works, making test requests. From some external server run this commands:
# mysql -h 10.10.10.1 -u haproxy_root -p -e "show variables like 'server_id'"Enter password:
+---------------+-------+
| Variable_name | Value |
+---------------+-------+
| server_id     | 1     |
+---------------+-------+# mysql -h 10.10.10.1 -u haproxy_root -p -e "show variables like 'server_id'"Enter password:
+---------------+-------+
| Variable_name | Value |
+---------------+-------+
| server_id     | 2     |
+---------------+-------+
All working fine, you can see the “round robin” balancing between our MySQL servers. Now we need to check the failover when the server1 will go offline for example. Go and restart or shutdown the server1, and check that virtual IP was moved to server2 and requests to the MySQL servers still OK, but now there is only MySQL on server2 will respond:
server2# ip a
....
2: ens19: <BROADCAST,MULTICAST,UP,LOWER_UP> mtu 1500 qdisc pfifo_fast state UP group default qlen 1000
    link/ether bla:bla:bla:bla brd ff:ff:ff:ff:ff:ff
    inet 192.168.0.2/24 brd 192.168.0.255 scope global ens19
       valid_lft forever preferred_lft forever
    inet6 fe80::bla:bla:bla:bla/64 scope link
       valid_lft forever preferred_lft forever
3: ens18: <BROADCAST,MULTICAST,UP,LOWER_UP> mtu 1500 qdisc pfifo_fast state UP group default qlen 1000
    link/ether bla:bla:bla:bla:bla:bla brd ff:ff:ff:ff:ff:ff
    inet 10.10.10.3/24 brd 10.10.10.255 scope global ens18
       valid_lft forever preferred_lft forever
    inet 10.10.10.1/24 brd 10.10.10.255 scope global secondary
....
Check MySQL requests again:
# mysql -h 10.10.10.1 -u haproxy_root -p -e "show variables like 'server_id'"Enter password:
+---------------+-------+
| Variable_name | Value |
+---------------+-------+
| server_id     | 2     |
+---------------+-------+# mysql -h 10.10.10.1 -u haproxy_root -p -e "show variables like 'server_id'"Enter password:
+---------------+-------+
| Variable_name | Value |
+---------------+-------+
| server_id     | 2     |
+---------------+-------+
After the server1 will return online, the virtual IP will be moved back to it.
And we did, we just configured and tested our MySQL cluster, and it now readies to serve requests.

Thanks for sharing this Information.
ReplyDeleteMysql DBA Training
As I work with database, I found different tools such as salesforce net connector
ReplyDelete